Health Dashboard
1.0 System Architecture Overview
The Health Dashboard is a processing unit designed to synchronize two distinct data points.
Deployment A: CM (Coatings Manager): This contains the entire point cloud of the platform without any differentiation. The area is calibrated to match the client's perceived platform dimensions. It tracks coating breakdown (Ri0–Ri5) across the entire facility.
Deployment B: PSIM (Pressure System Integrity Management): This contains only the point cloud of pressure equipment. It is not calibrated; it represents raw scan data. It differentiates corrosion by severity (Light, Moderate, Heavy) and has the contextualization abilities.
2.0 Phase 1: Baseline Initialization
Establishing the baseline is the first step for the health score.
CM Calibration: The Coatings Manager (CM) area is calibrated to align with the platform's physical perspective. The paint block total area and Ri0–Ri5 values are proportionally scaled based on the calibration factor.
Detection Mapping: The system maps existing corrosion using Ri scales for CM and corrosion severity (Light, Moderate & Heavy) along with contextualization for PSIM to establish the initial baseline score.
Baseline Output: A final health score is calculated based on customizable weightage between structural and pressure conditions and stored in the System of Record (SOR).
3.0 Phase 2: Operational Burndown (Remediation)
Health updates are triggered automatically upon completion of work items.
3.1 Structural Remediation (CM)
Closing a structural chase item automatically triggers a health burndown and the underlying calculation depends on area values in the chase item.
3.2 Pressure Remediation (PSIM)
When a pressure chase item is updated to "Completed", the system identifies the specific pipe section within that paint block and automatically triggers a health burndown.
For updating POI statuses, please refer to the usage guide mentioned in section 4.0
3.3 Block Closeout Workflows
The overall platform health score is a combined contribution from both the Pressure Integrity (PSIM) and Coatings Manager (CM) deployments.
Scenario 1: Structure Only
Context: Structural items are completed, but pressure-related work is not part of this specific close-out.
Actions in Coatings Manager (CM):
Navigate to the concerned paint block.
Enter the Acceptance of Work (AOW) area value under the Partial Completion field. The system will auto-calculate the scoring.
If the specific structural chase items that were completed are known, update their status to closed while closing the paint block.
Actions in Pressure Integrity (PSIM): No action is required in the PSIM deployment.
Scenario 2: Pressure Only
Context: Pressure components within a paint block have been painted and completed, but the full paint block is not yet complete.
Actions in Pressure Integrity (PSIM): You have two options based on the extent of the work:
Option A (Full Pressure Completion): Select the paint block and mark all pressure components and associated chase items as Completed. The system will auto-calculate the scoring based on the known paint block areas.
Option B (Partial Pressure Completion): Select the paint block and deselect specific assets or chase items that are not completed or should be excluded. The system will auto-recalculate the completion score, excluding the deselected items.
Actions in Coatings Manager (CM): To keep the deployments in sync, you must manually enter the AOW area value into the CM deployment. This allows the system to auto-calculate the scoring and ensures the structural coating progress is accurately reflected.
Scenario 3: Full Completion
Context: All work within the paint block (both structure and pressure) is fully complete.
Actions:
Fully close out the paint block in the Pressure Integrity (PSIM) deployment.
Fully close out the paint block in the Coatings Manager (CM) deployment.
Both systems will auto-calculate their scoring, resulting in a 100% healthy status for that area and updating the combined platform score.
Important Note: Closing the paint block in only one system will result in an incomplete or incorrect overall platform score.
For adding remediation areas in CM paint block, please refer to the usage guide mentioned in section 5.0
4.0 User Guide: Updating POI Statuses
This guide outlines the workflow for updating the status of workpacks and individual POI/VOIs. These steps apply to both PISM and CM deployments.
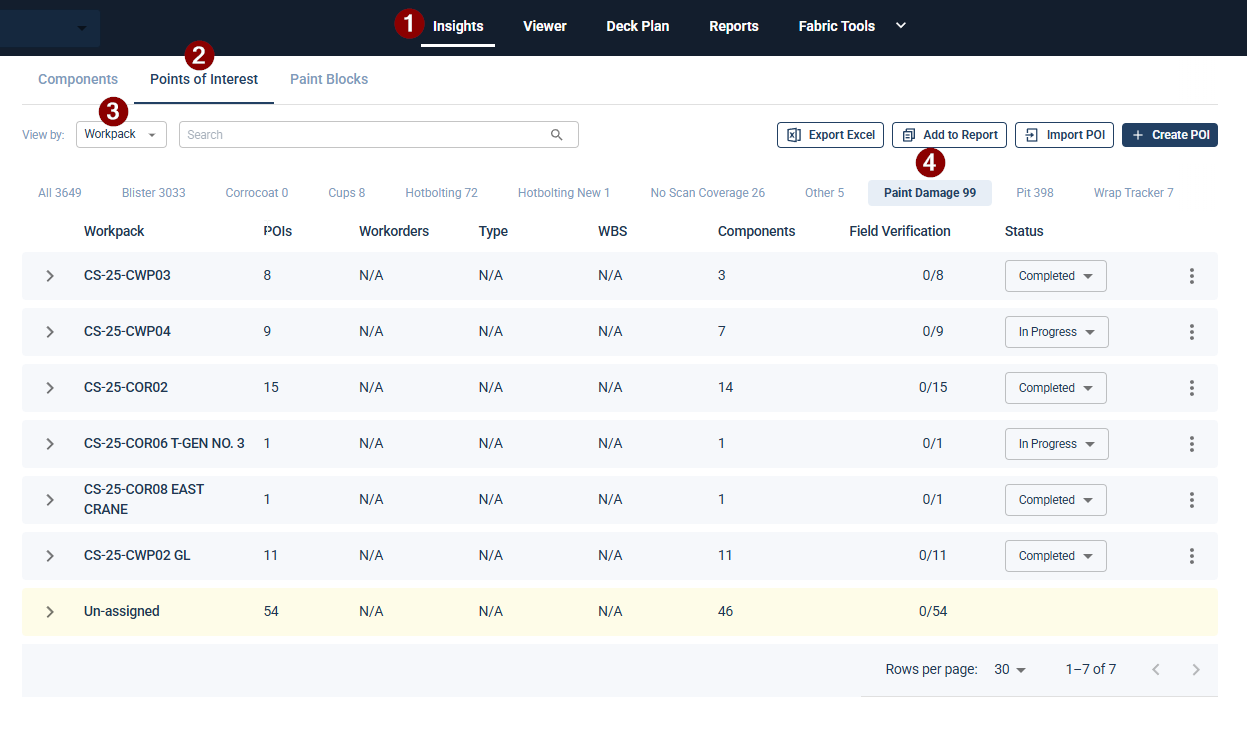
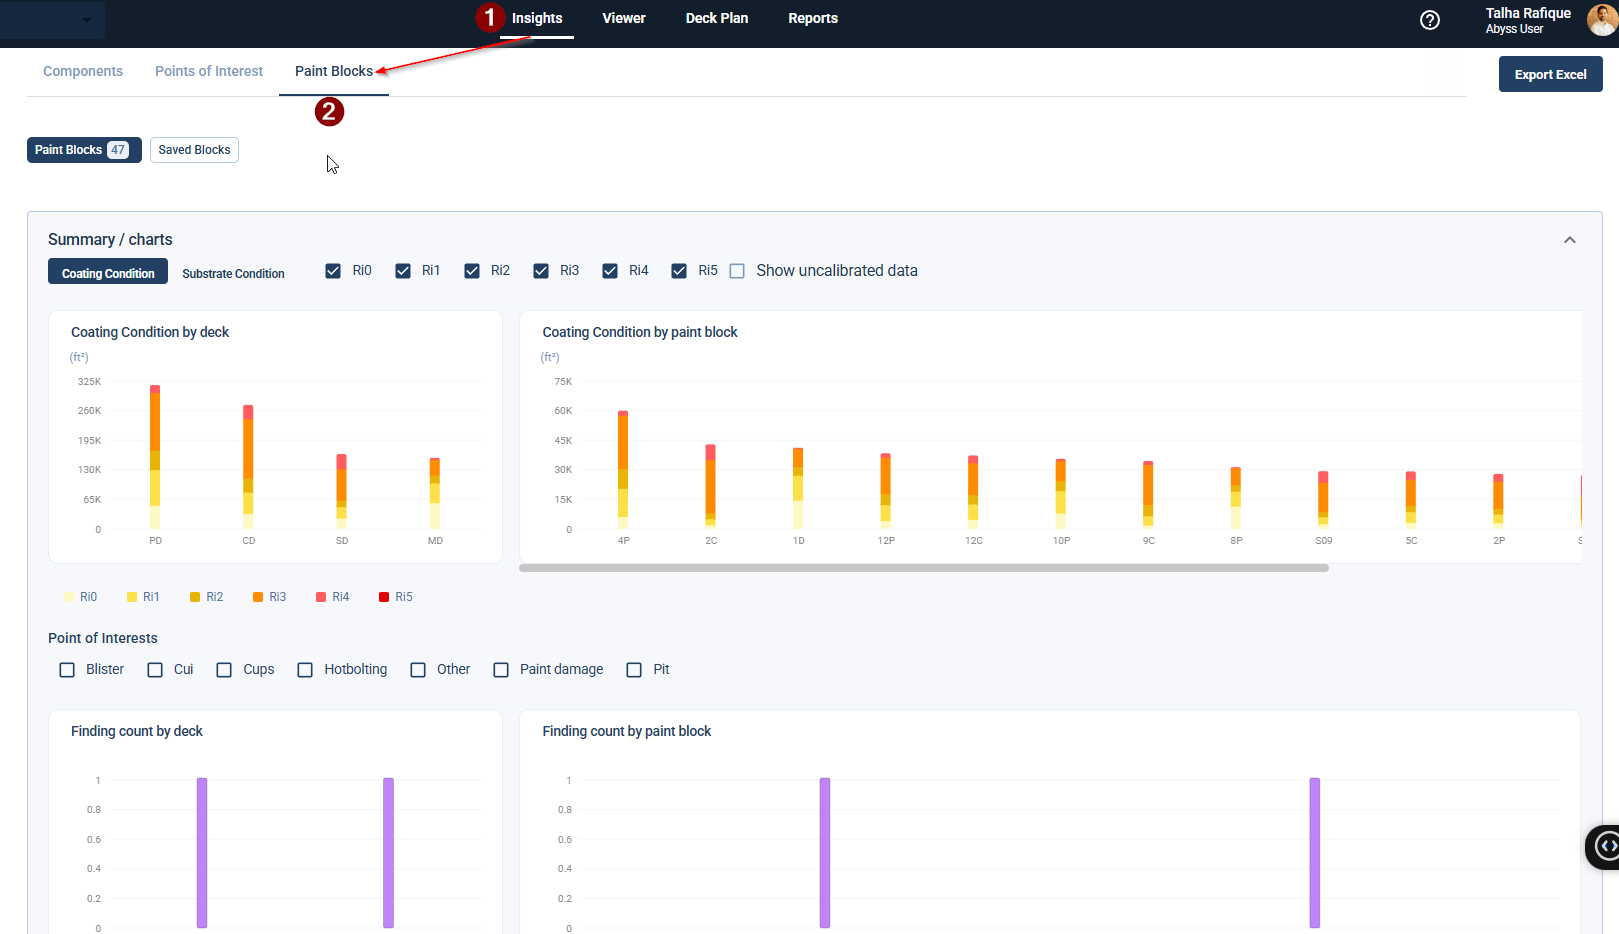
Step 1: Navigate to the Points of Interest Tab
Open the Insights tab from the top navigation bar.
Select the Points of Interest sub-tab.
Select Workpack in the view by dropdown
Step 2: Update Status (Two Methods)
You can update statuses at the Workpack level (bulk) or the Individual POI level.
Method A: Updating an Entire Workpack
If a full workpack is finished, you can update it in one click:
Find the desired workpack in the list.
Click the status dropdown (e.g., "In Progress") in the workpack row.
Select Completed.
Note: Changing a workpack to "Completed" will automatically update all nested POIs to "Completed."
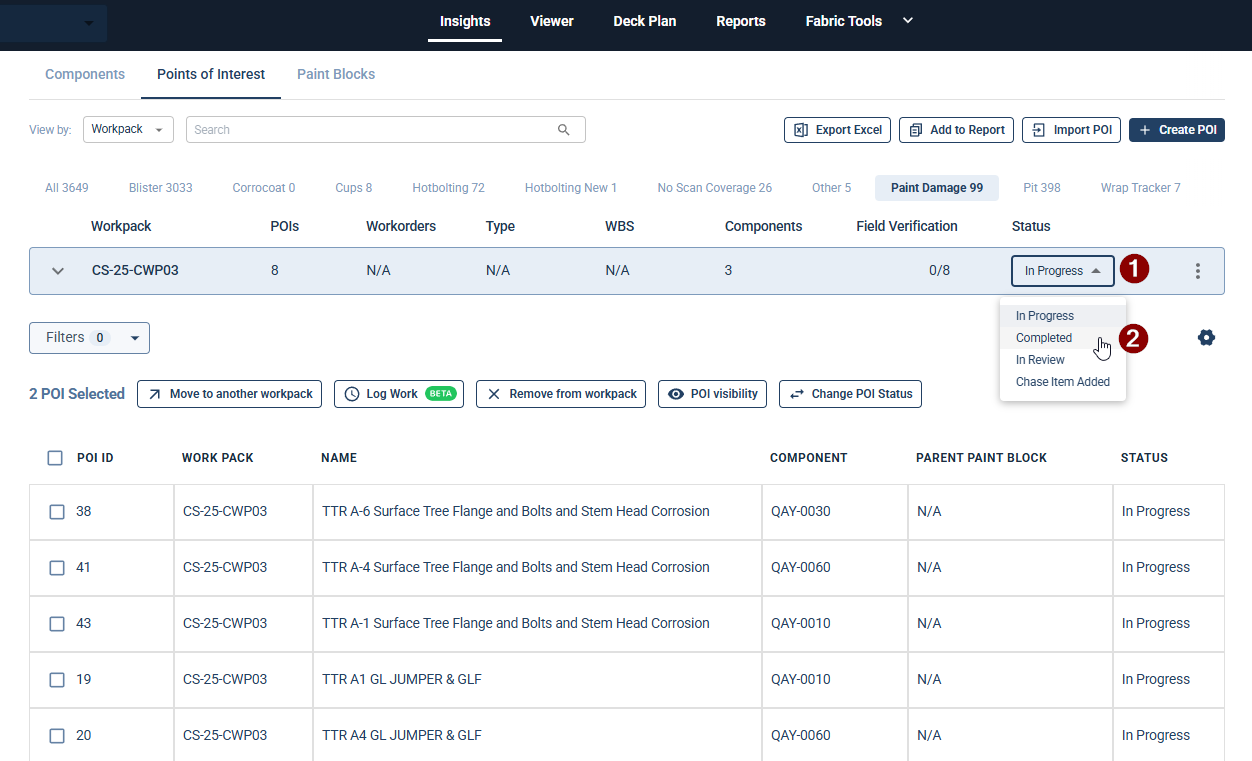
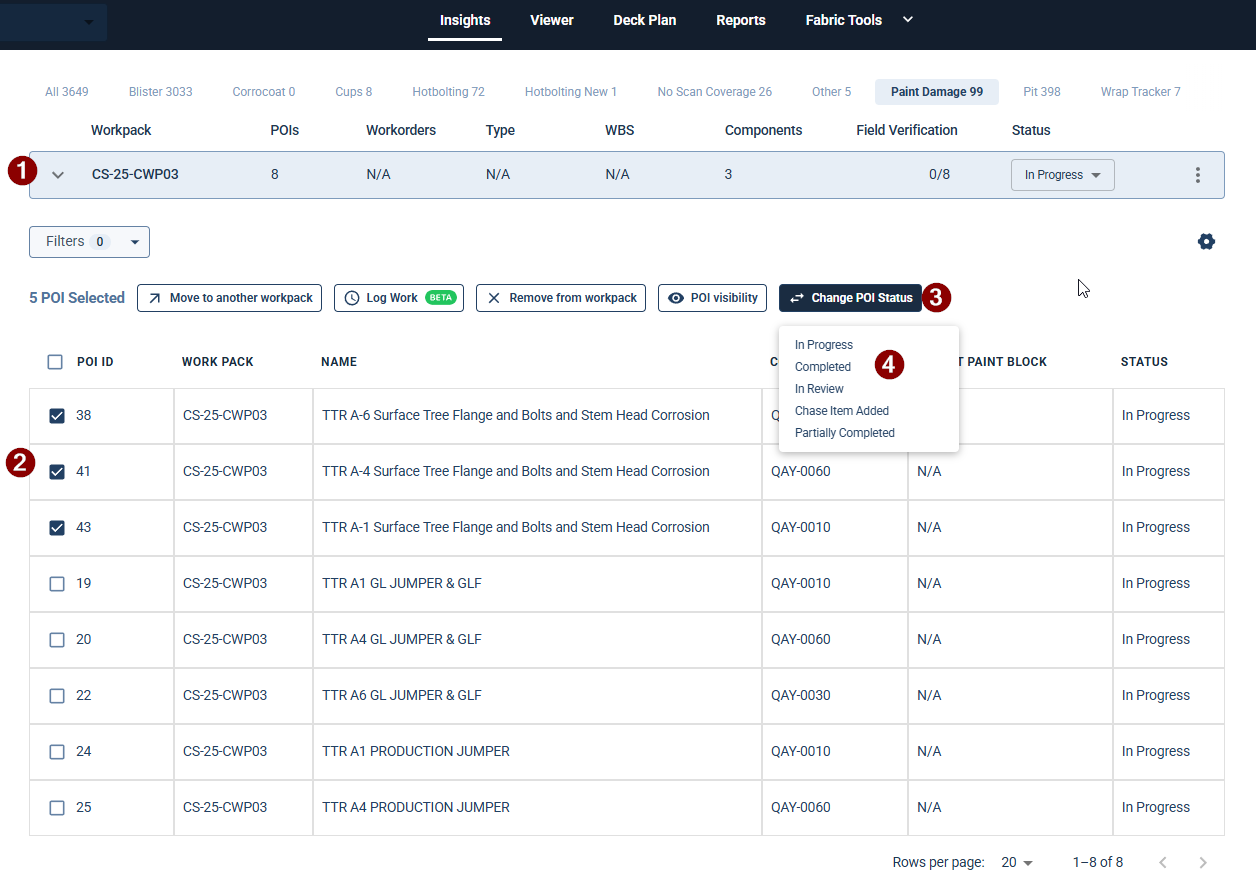
Method B: Updating Individual POIs
To update specific items within a workpack:
Click the expand arrow (>) next to the workpack name to view its POIs.
Use the checkboxes to select the specific POI IDs you wish to update.
Click the Change POI Status button above the table.
Select the new status (e.g., Completed) from the dropdown.
5.0 User Guide: Adding Remediation Areas in CM Paint Blocks
1. Navigating to Paint Blocks
Navigate to the Insights tab.
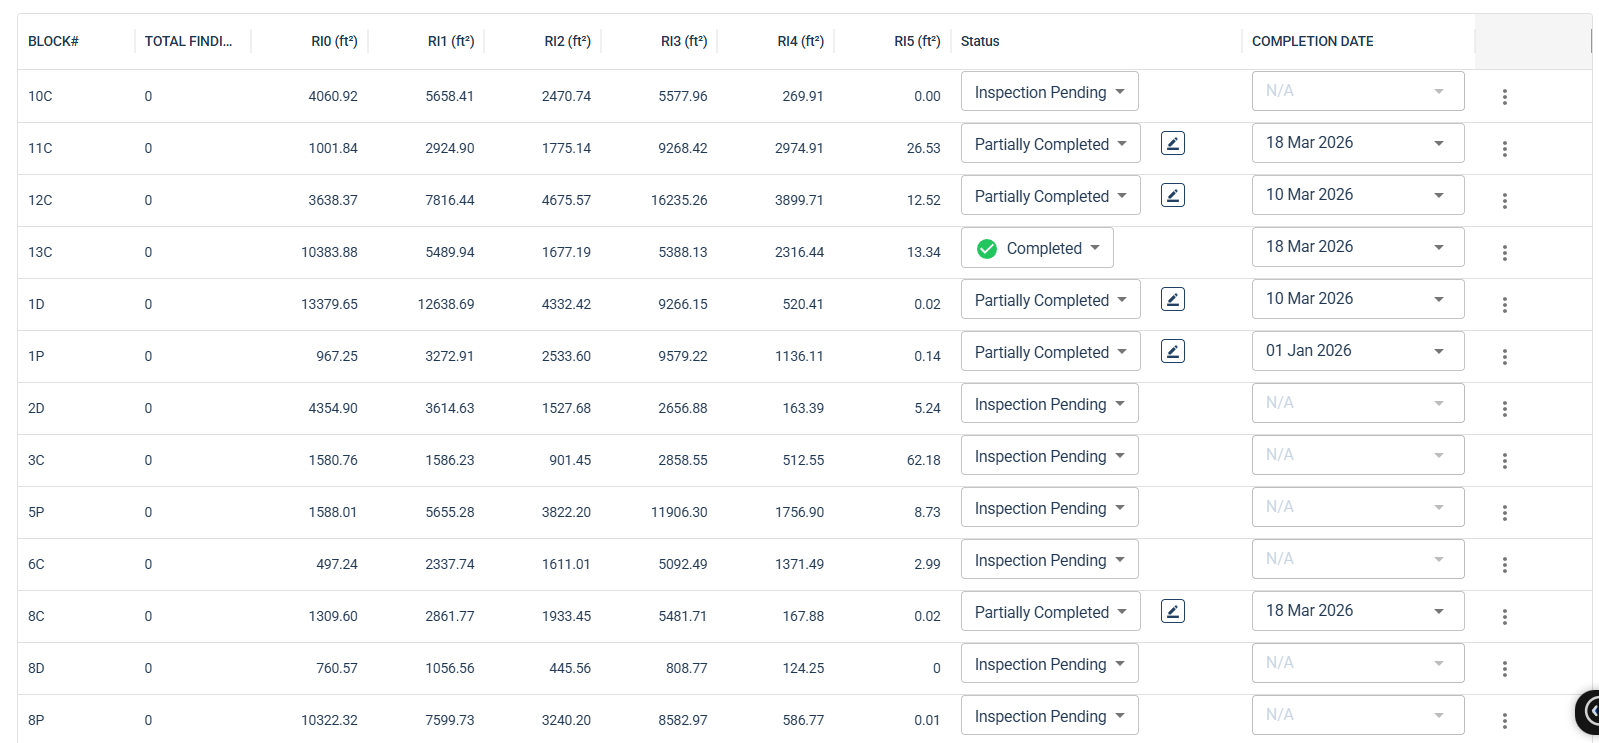
Select the Paint Blocks sub-tab. You will see a list of all paint blocks with their current status.
2. Updating a Partial Remediation
If a portion of a paint block has been remediated, follow these steps to update the area:
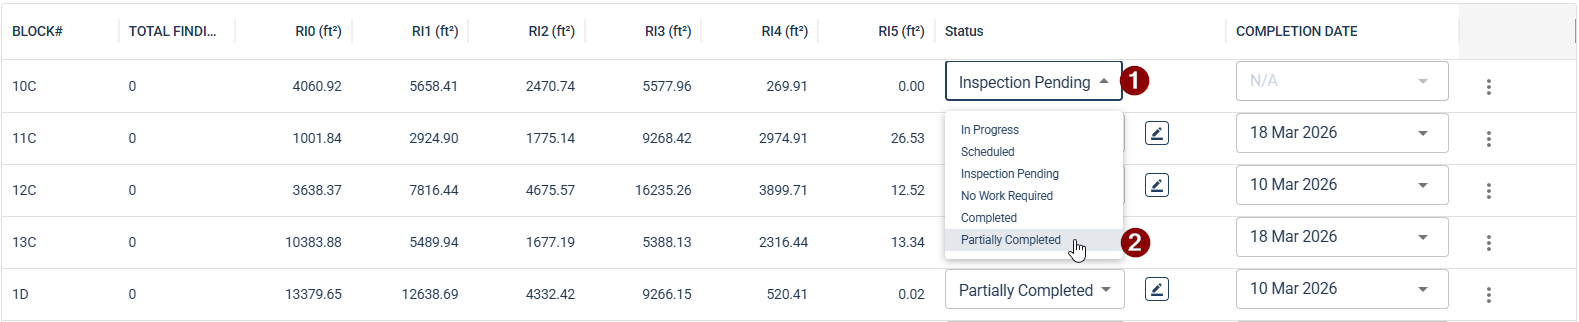
Select the Block: Locate the specific block (e.g., 10C) from the list.
Change Status: Click the dropdown in the Status column and select Partially Completed.
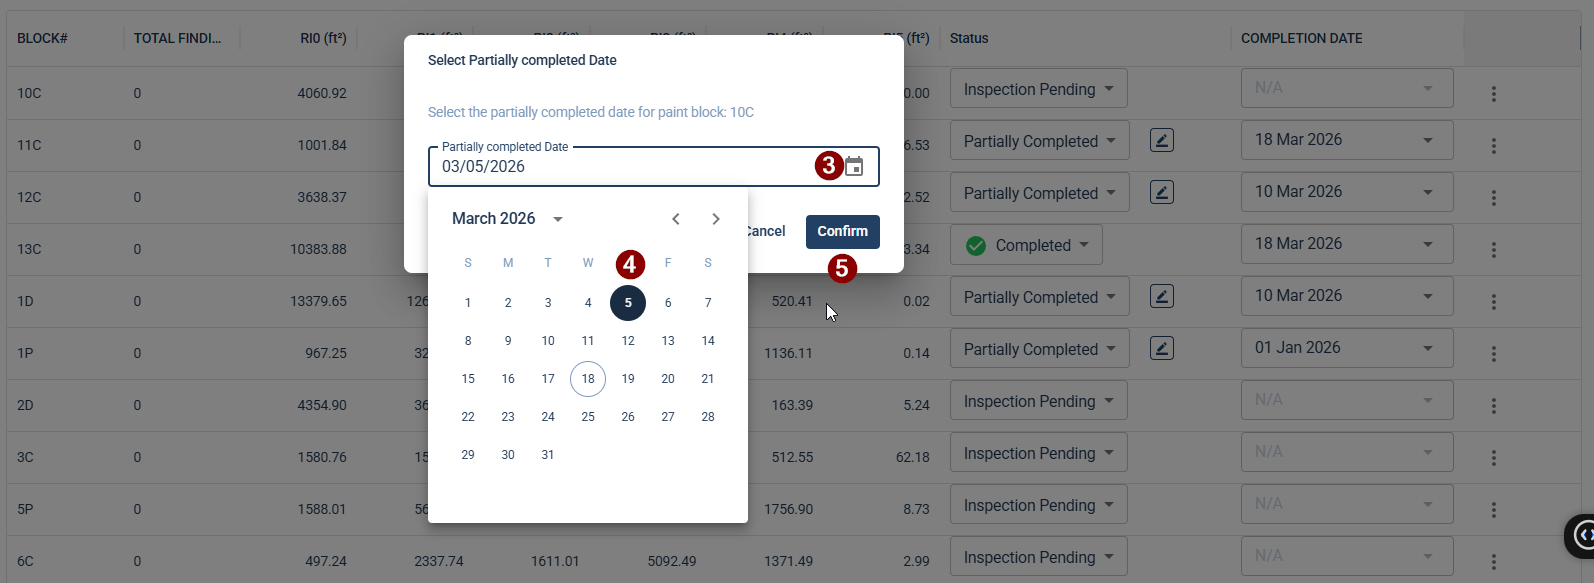
Set Date: A calendar pop-up will appear. Select the date the remediation took place. You can select a past date as well.
Enter Area:
Click the Coating Area tab in the pop-up window.
In the New completed area field, enter the size of the area remediated (e.g., 12000ft²).
The system will automatically calculate the percentage of the total block area that has been completed.
Save: Click Save & Update.

3. Adding Subsequent Remediation
If a user has already remediated a portion of a block (e.g., 12000 ft²) and later completes an additional area (e.g., 1000 ft²), follow these steps to update the record:
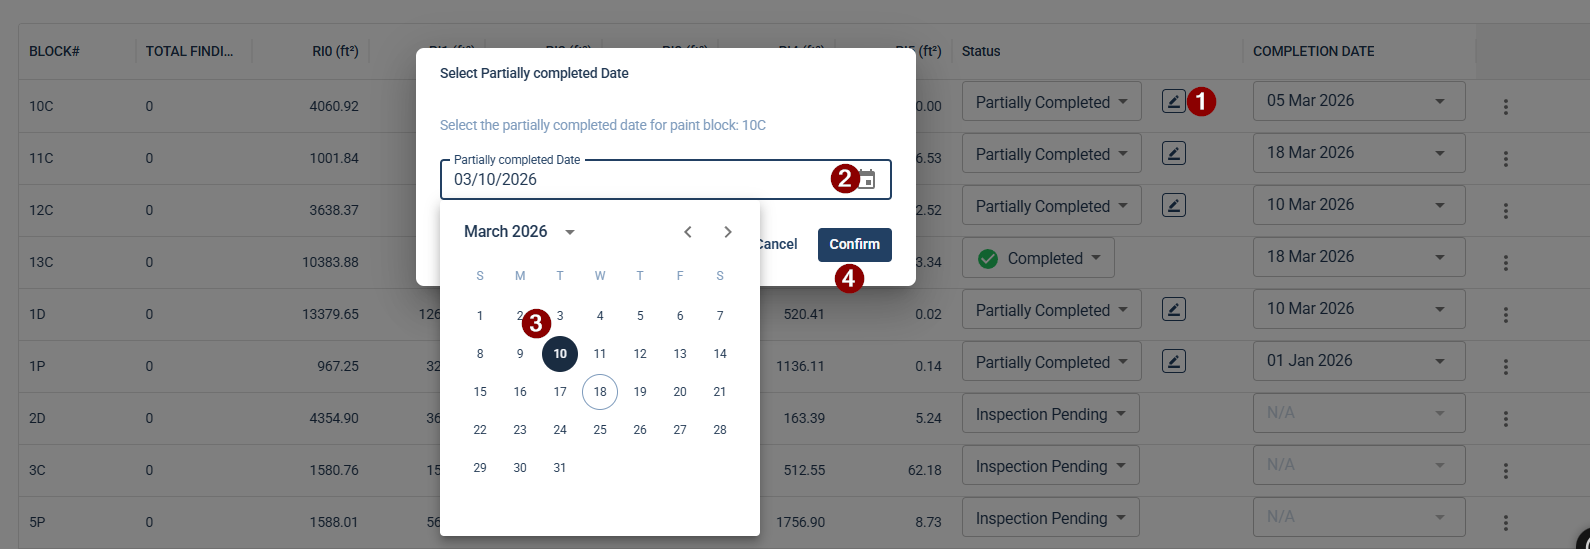
Re-open the Remediation Dialog
Locate the block that is already marked as Partially Completed (e.g., 10C).
Click the Edit (pencil icon) located next to the status dropdown in that specific row.
Set the New Remediation Date
A calendar pop-up will appear. Select the new date for this second round of work (e.g., March 10th).
Click Confirm.
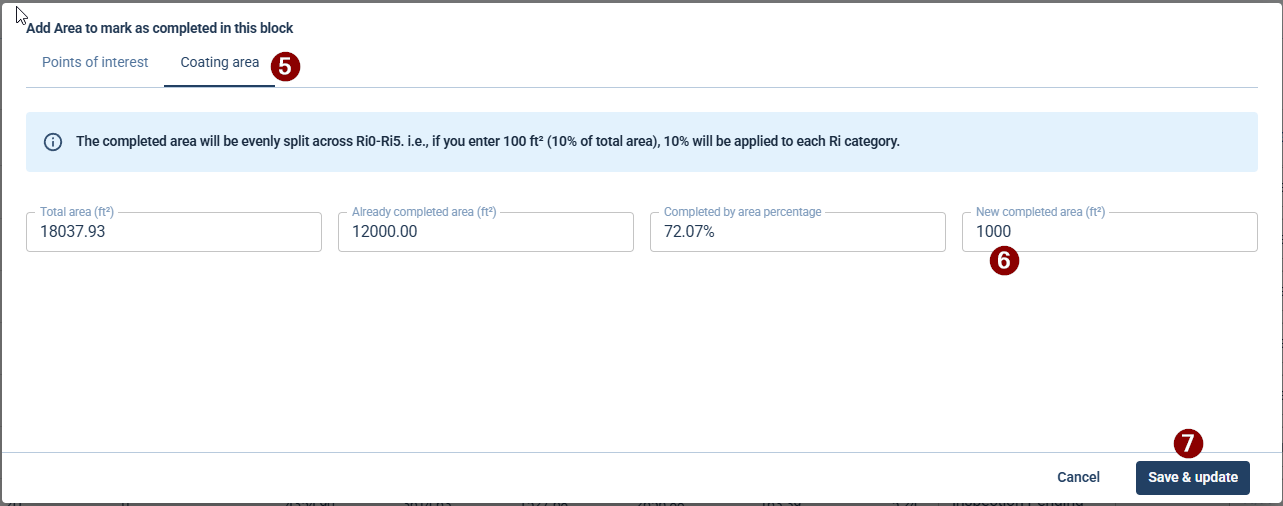
Enter the Additional Area
In the Add Area to mark as completed window, navigate to the Coating Area tab.
You will see the Already completed area field showing the previous total (e.g., 12000 ft²).
In the New completed area field, enter only the additional amount remediated during this specific session (e.g.,1000).
Review the Cumulative Progress
The system will automatically update the Completed by area percentage to reflect the new total (the sum of the first and second remediations).
Click Save & Update.
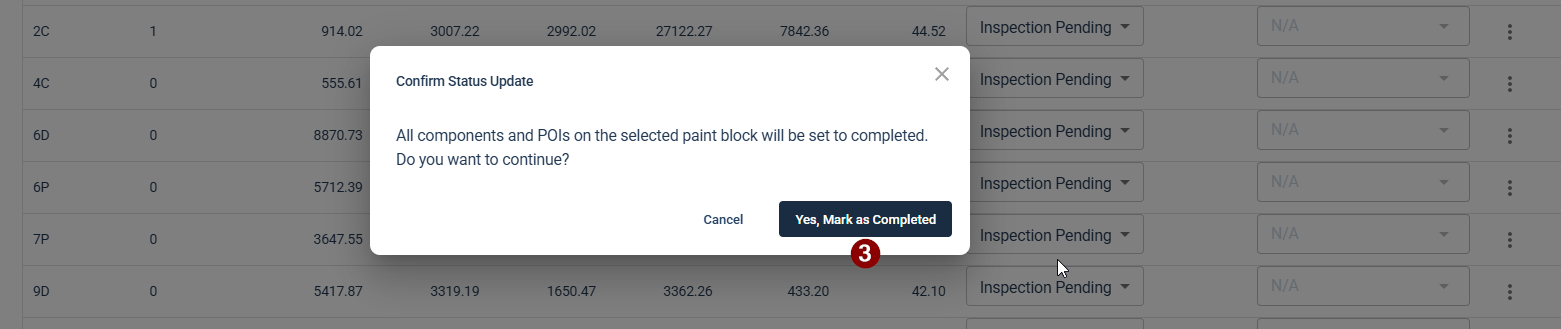
4. Marking a Block as Fully Completed
When a block is 100% remediated, you can update its status directly:
Locate the block (e.g., 4C).
Select Completed from the status dropdown.
Confirm the update in the prompt window by clicking Yes, Mark as Completed.

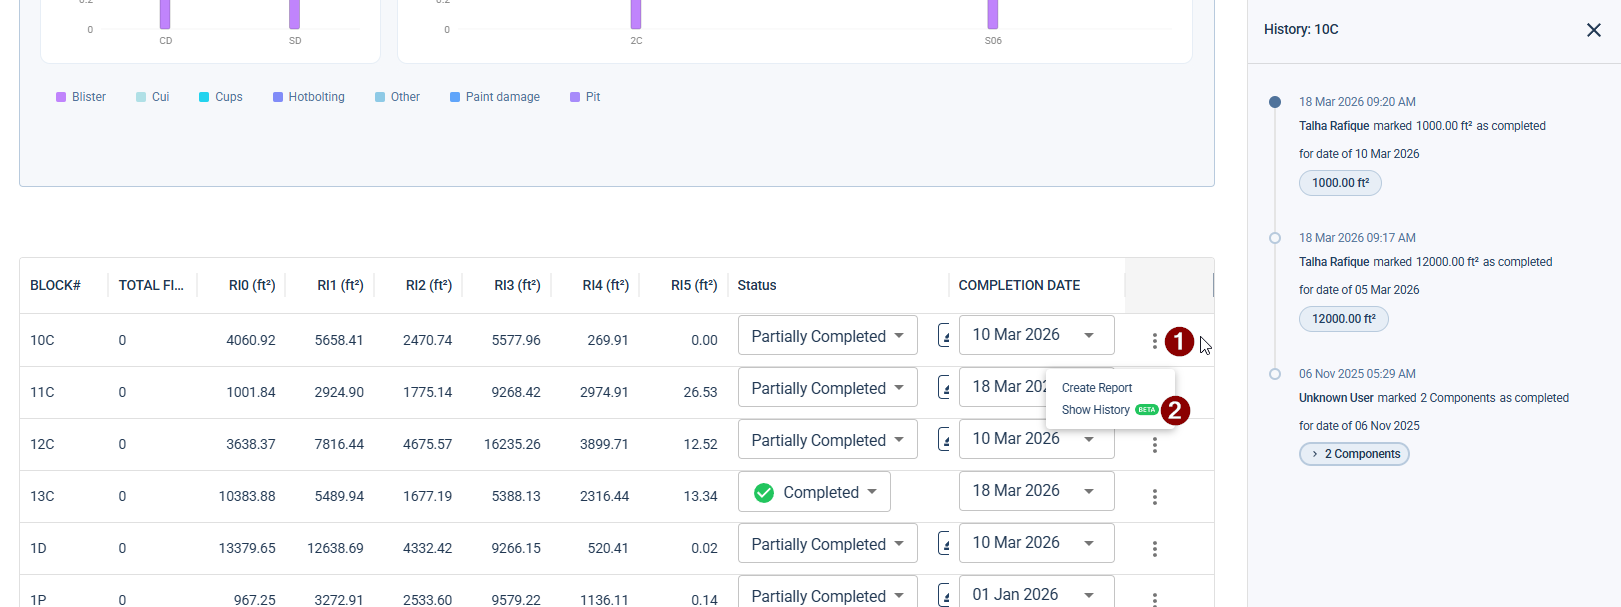
5. Tracking Remediation History
To view a log of all actions performed on a specific block:
Click the three-dot menu at the end of the block's row.
Select Show History.
A side panel will display the user, timestamp, area remediated, and the effective date of the work.
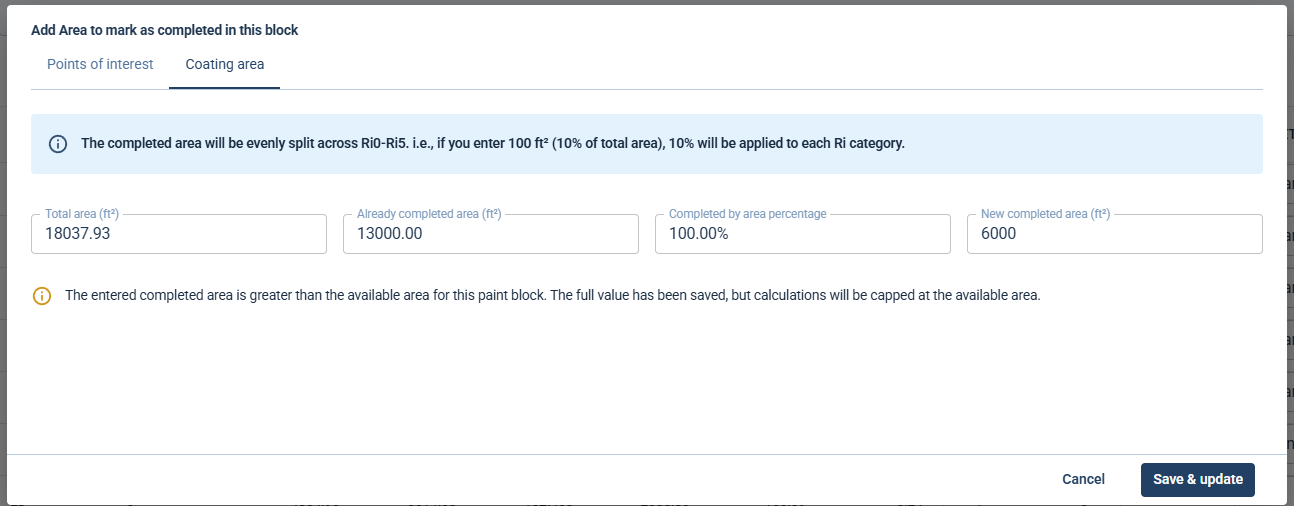
6. Area Validation
If you enter a "New completed area" that exceeds the remaining available area for that block, a message will appear:
"The entered completed area is greater than the available area for this paint block."
Result: The actual value you typed is saved in the "System of Record," but the system caps the calculation at 100% for health burndown.
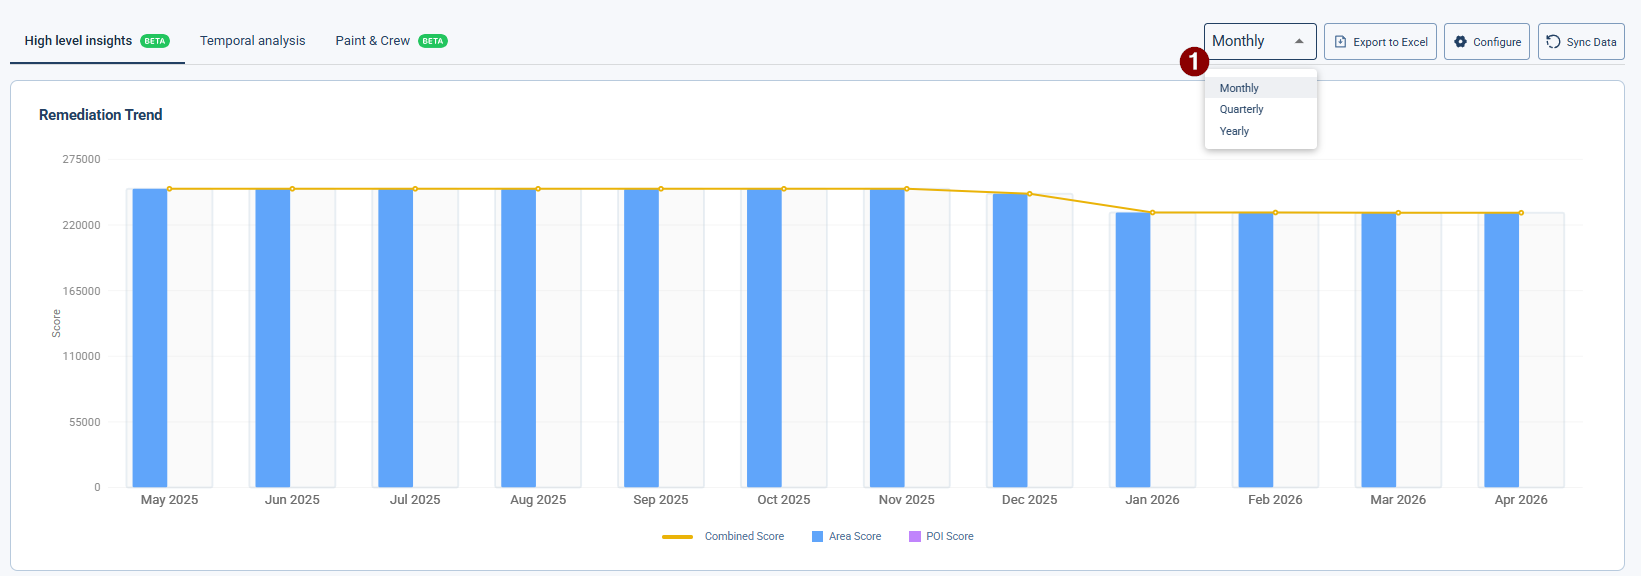
6.0 User Guide: Viewing & Syncing the Burndown chart
When the user selects a platform, this is the default view of the health chart available. User can click on the Sync Data button to update the chart. The updated chart will now include data of all the chase & block remediations made up till that time.
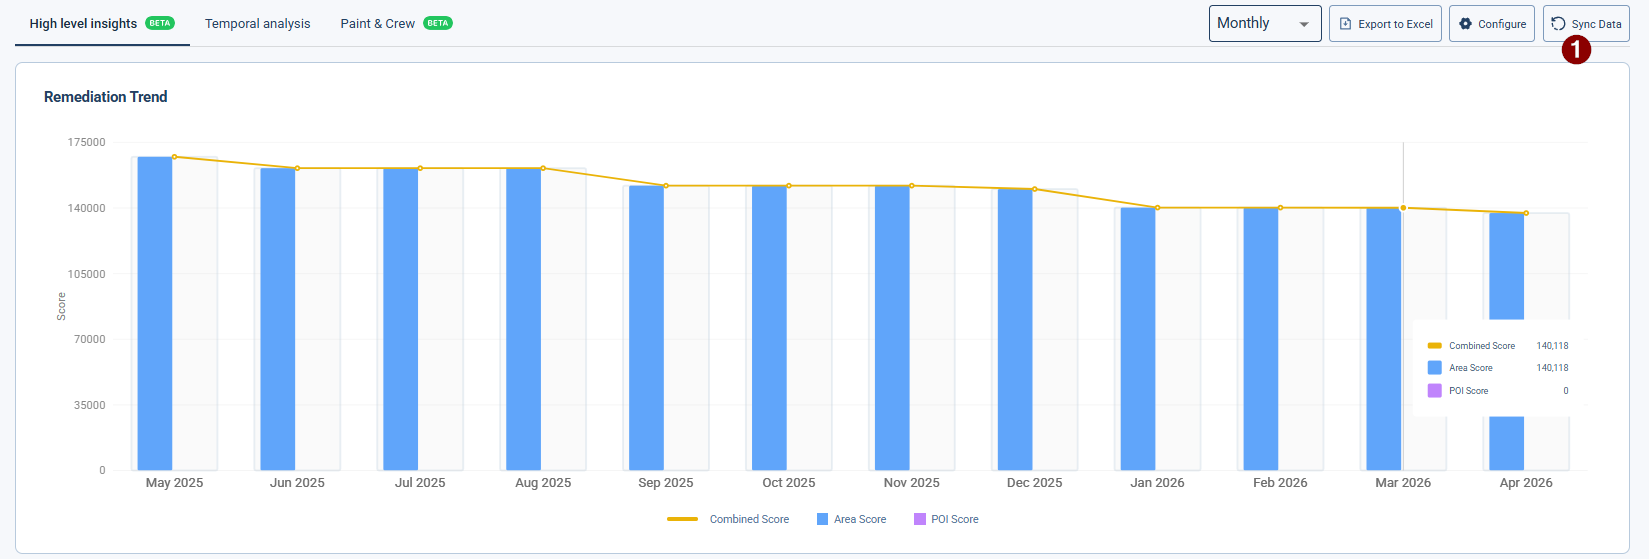
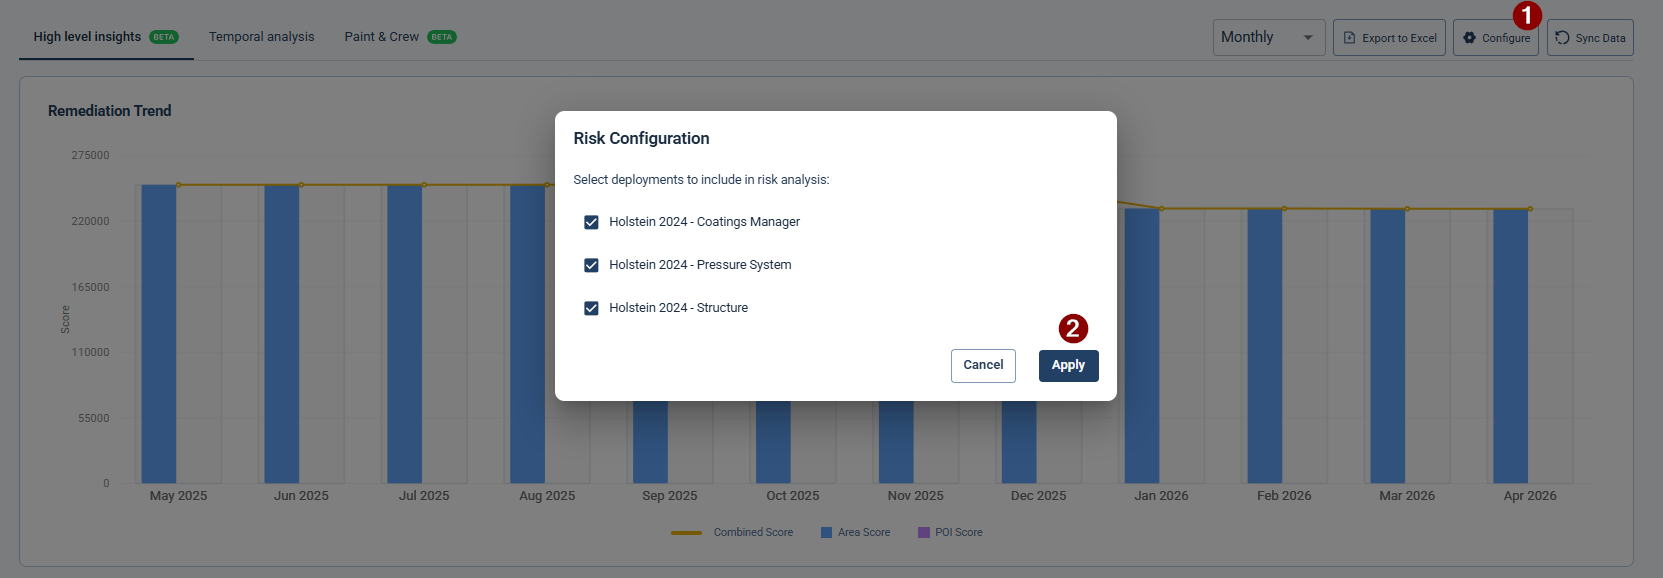
Users can select the configuration option to either see the score of one deployment or the aggregate of all the selected deployments.
Users can also update the timeframe view of the charts.