Deck Plan & Heatmaps
Welcome to the comprehensive user guide for the Deck Plan & Heatmap feature within Abyss Fabric. Whether you're a novice or an experienced user, this guide was crafted to simplify your navigation through the intricacies of this tool. We’ve focused on enhancing your experience by meticulously detailing the steps for deck navigation, location searching and heatmap application within Abyss Fabric. We hope this guide helps you unlock the full potential of Abyss Fabric's Heatmap feature.
Users have to enter their credentials to login to Fabric v2
Users can see the available platforms. Users can use the search functionality to further filter out the results. Clicking on a platform tile will take the users to that platform
After selecting a platform of choosing, user can switch to deck plan tab
Users have the option to switch between deck plan GA drawings by clicking on the thumbnails (The selected deck thumbnail is highlighted in blue). The markers on drawing refer to the camera locations used on the deck during data capture. The area percentages on deck plan thumbnails show the split of area of the entire platform per deck deck level
Users have the option to zoom in and out of the drawing by using the buttons on the bottom right of the drawing. Users can pan around on the drawing by holding the left mouse button
Hovering over image marker shows its name in spherical bar and its position is highlighted on the drawing
Users can search a camera position to see its location on the drawing by using the search bar above the drawing. The searched image is then highlighted on the drawing
User can turn on the boundaries of the paint blocks by using the Outline option under Paint region heading in the tab on the right side
Users have the option to turn off the camera markers or change their size by using the toggle and slider on top right of the page
If the user wants to land into image directly from the deck plan, they can click on image marker, this would take them to desired image
User can draw heatmap of the points of interest on the entire deck by clicking on the checkboxes under the heading Point of Interest (Note how Paint damage has been grayed out meaning such point of interest does not exist on selected deck)
User can apply a heatmap of coating or substrate condition of the entire deck by using detailed (Voxel) option under heatmap properties in the menu on the right and setting the desired option in Value and applying the changes (Blue button Apply Changes on bottom right)
Legend of coating condition and corrosion is available below the drawing
If the user is interested in focusing on the desired query (single asset or assets with similar diameter or service) instead of the entire deck, the user can select the apply query function and then apply changes. This will show the POI markers, heatmaps and camera locations relevant only to the query. The thumbnails of decks in which query does not exist will be grayed out and areas per deck will change correspondingly
Clear query button on top left in left query menu allows user to clear all selected filters and remove all applied heatmaps
Measuring Tool
User can use the measuring tool in the viewer tab by clicking on measure tool button on top left
Measuring tool can be used in 2 different ways
While viewing the complete platform or a certain query (If the user wants to measure distance between different assets)
In asset isolate mad, when user wants to measure lengths on a single asset
Clicking on measure tool button enables the measure mode, a prompt is provided to click on points to start measuring length
After the first click, the length field starts appearing
After the second click, the line starts appearing and measured length can be seen
Users can do multiple clicks to keep increasing the length of line
In the end users can hit the Done button to finish with the measurement
POI Grouping
Introduction:
Welcome to the complete user guide for the POI Grouping Tool within Abyss Fabric. Whether you're just getting started or are already familiar with the tool, this guide is crafted to enhance your experience in grouping Points of Interest (POIs) into workpacks. We've thoroughly outlined the steps for grouping POIs, handling workpacks, and leveraging the latest features for remediating and creating new workpacks. This guide equips you with all the knowledge you need to effectively organize, manage, and optimize your POI workpacks within Abyss Fabric.
Step-by-Step Guide
POI Grouping Interface
After selecting a platform, you'll be taken to the “Insights” page, where you’ll find an overview of the components linked to that platform.
To view Workpacks, navigate to the “Point of Interest” Tab within the Insights page
Select view by “Workpack” option.
Filter Workpacks by defects
Utilize this feature to view workpacks based on the specific defects they contain.
By filtering for defects within the Workpack Management section, you can easily identify and access workpacks that address those particular defects.
View POIs within a Workpack
To view the Points of Interest (POIs) associated with a specific Workpack, click on the down arrow next to the Workpack name. This action will display the list of POIs linked to that Workpack.
You can filter the displayed POIs based on various criteria such as Paint Block, Verification, Accessibility, and Status. Use the filter options available above the list of POIs to narrow down your search and focus on the most relevant entries.
Click on any POI from the list to open a detailed information panel on the right side of the screen. This panel will display all relevant details about the selected POI, including its name, component, status, accessibility, and any comments associated with it.
Locate a workpack associated with a specific asset.
To locate the workpacks associated with a specific asset, navigate to the left-hand panel section within Abyss Fabric.
Use the “Equipment Tag” option to find the asset in question, and click on “Apply Query”
The system will display the corresponding workpack along with all related Points of Interest.
Creating a new Workpack
Begin by selecting the option “ Single POI “ to view POIs individually.
Select the specific POIs you want to include in the new Workpack.
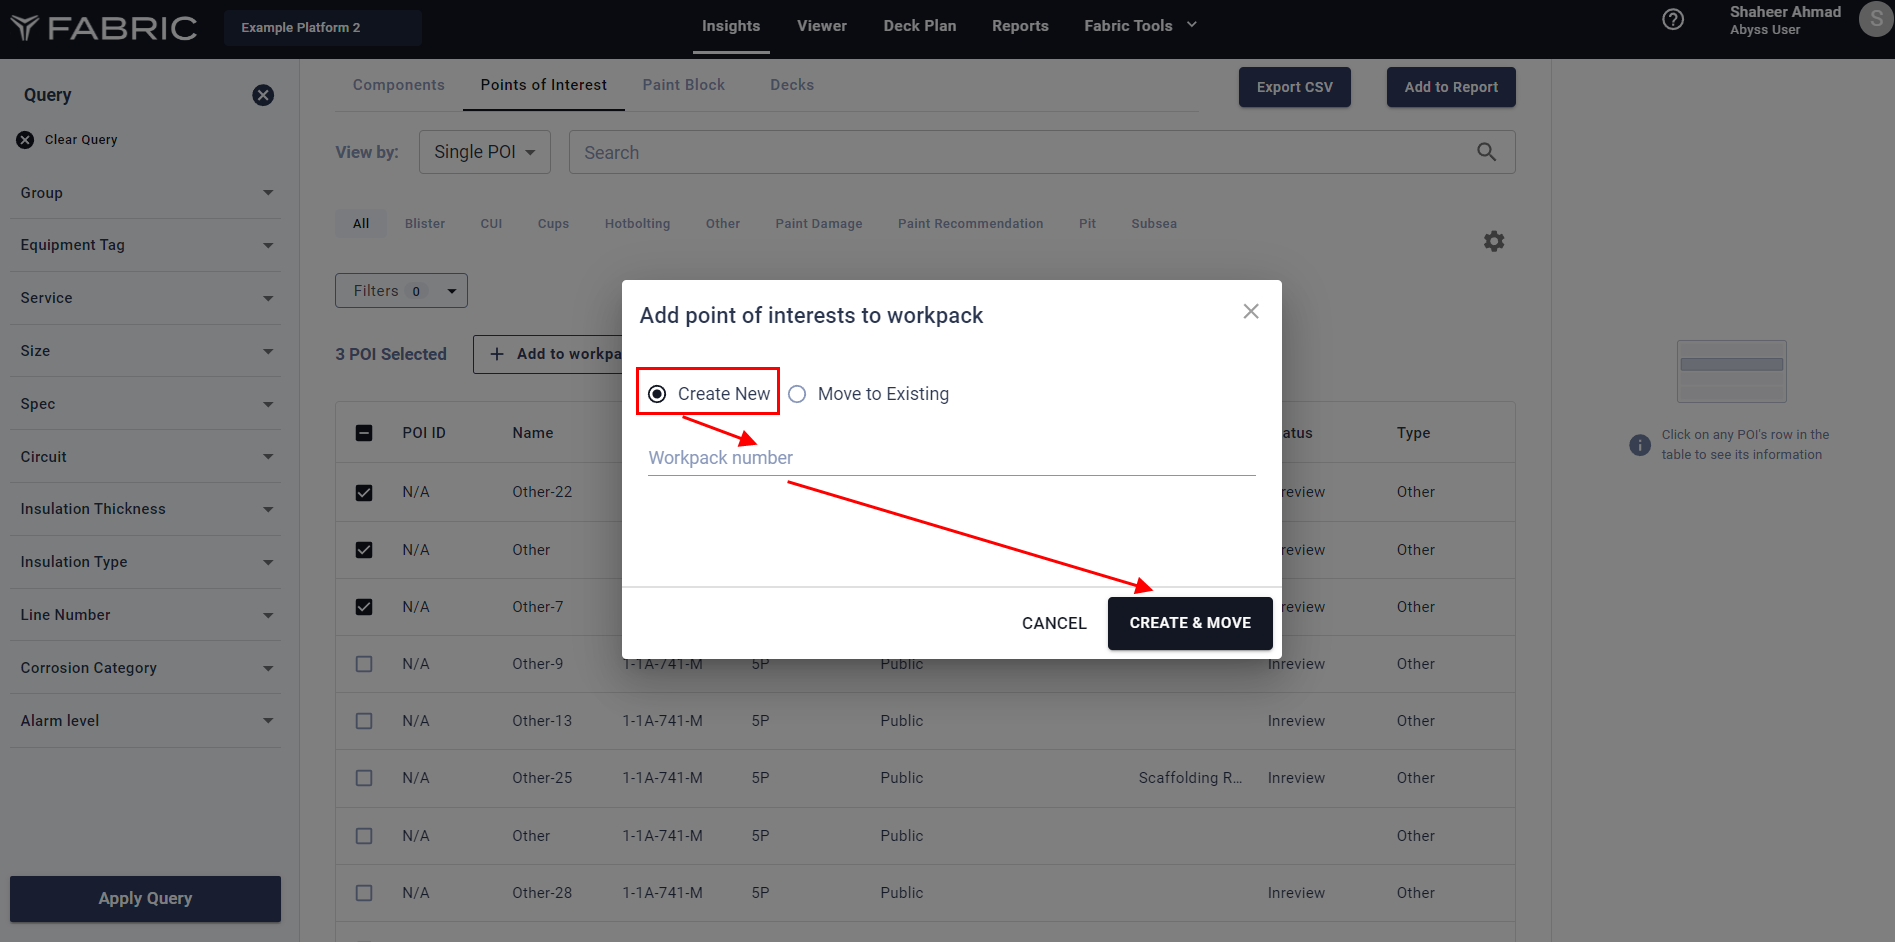
Click on the "Add to Workpack" button..
Enter a name for the new Workpack and click "Create and Move" to finish the process.

Adding POI to an existing Workpack
Click on “Move to Existing” Option.
Type in the number of the existing Workpack to which you want to add the POIs.
Finalize by clicking "Move" to add the POIs to the selected Workpack.
Setting the POI Visibility
Choose the POIs for which you want to modify the visibility settings.
Click the "POI Visibility" button to open the visibility settings.
A pop-up will appear, allowing you to make the POI visible to a specific group. Select the desired group and click "Confirm" to apply the changes.
Edit and Delete a Workpack
Use the "Edit" option to rename the Workpack as needed.
Select the "Delete" option to remove the Workpack. All linked POIs will be moved to the "Unassigned" category.
Updating status of a Workpack
Click on the status dropdown menu to update the status of the Workpack.
Choose the appropriate status from the available options to apply the update.
Enable/Disable the POI Columns
Choose the specific columns you want to display, such as POI ID, Paint Block, Accessibility, or Status etc.
Click the "Apply" button to confirm and display the selected columns.
